School Hallway Space

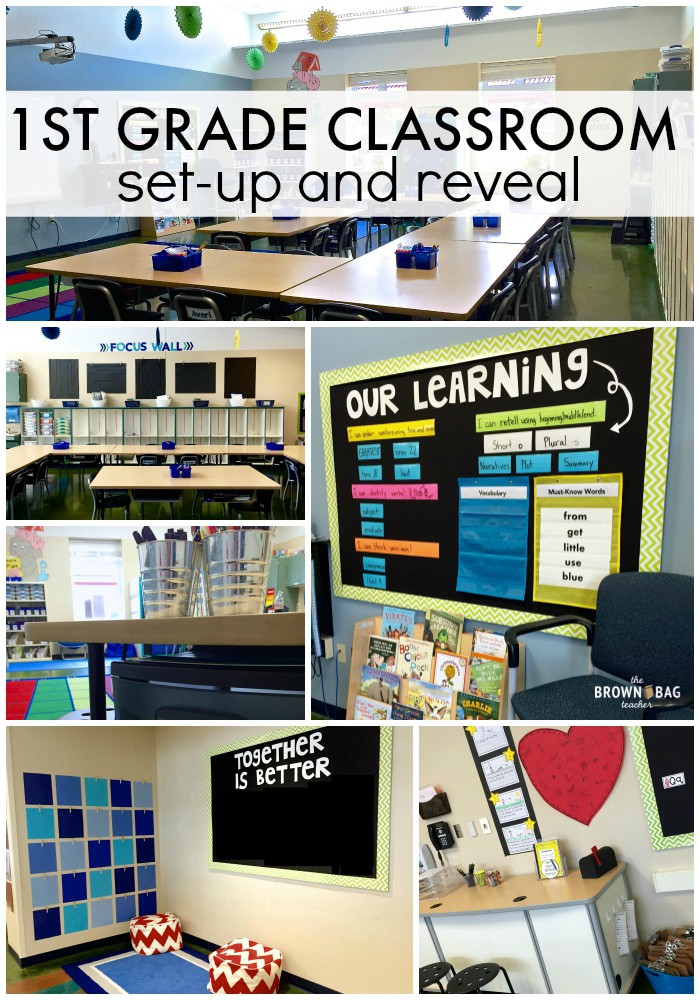
1st Grade Classroom Set-up

Work on Writing Space


On the side of the desk, you see mini-dictionaries with theme-specific words with picture clues. Then, there is our bucket of clipboards. Our class journals become collaborative writing projects and our mailbox will be introduced after Fall Break (in two weeks) as we learn to write letters. Pigeon (Mo Willems’ creation) takes the mail from our mailbox and delivers it around the school!

Above our Work on Writing center, is our classroom alphabet and number line. To the right of the center, you see our class word wall. Last year, our word wall was much higher (above the cubbies) and I was never able to maintain it. This year, I’m hoping to use it more by keeping it reachable…we shall see!

Small Group Area
Continuing to the corner, you see my Teacher Table. This is where my corner of the class is and where all of our small-group instruction happens. I have my white-board easel and chart paper, as well as, my 10-drawer rolling cart of organizing materials by day. I keep my guided math materials and my weekly-read aloud books on the top of the larger cabinet. In the larger cabinet, I store our math and reading games/manipulatives, indoor recess games, and other miscellaneous supplies.

Below the table, I have two 3-drawer Sterilite containers. The containers on the right are my personal drawers (snacks, data, basic supplies, notecards) and the drawers on the right are for guided-reading materials. The triad of silver containers were a gift from a student and I LOVE them. One container holds dry-erase markers, one holds highlighters and markers, and the third container holds pencils and pens. These are all materials I need for guided reading everyday and it makes them easy to access!

Classroom Library


Our library holds our new dry-erase focus wall. The best part of this focus wall is that I’M ACTUALLY USING IT THIS YEAR!!! Every Monday, I take a picture and text it to families via Remind texting. Each subject I-can has it’s own color (yellow = math, pink = grammar/writing, orange = theme, green = reading), the small blue sentence strips are for vocabulary words, and the Target pocket charts hold our must-know words. The blank spaces under the learning targets are where we add pictures/awesome work/examples. The ‘Our Learning’ header is MTF Jumpin’ Jack font that I printed on white cardstock and cut out…easy peasy.

Classroom Book Shelf
Elephant and Piggie are our favorite book characters. Within the first few weeks of school, we had read all of Mo Willems’ books together and we fell in love. They are hilarious, silly, and just-right for beginning 1st graders. I used colored bulletin board paper to make the characters and hope to add a quote about reading on the opposite wall sometime soon… again, we shall see! 😉
Every student has their own book bin. I use navy book bins and love them. Last year, I only had 2 bins break. That’s a huge win! Students keep just-right books in the bins and use them for Read to Self/Read to Someone. (Read here for alternative ideas to book bins!)
On the top shelves are seasonal books that go on our library display shelf. They are organized by theme. You can see more pictures of how I organized our themed books in this blog post. On the two bottom shelves, we have our leveled books. Right now, I have Levels A-L out. Hopefully by November, I’ll be able to take our the A and B book bins and trade them out for themed book bins!


Classroom Organization


Even if completely stacked, students can reach the top bins. I clearly label every bin so my friends know exactly what to grab and where to put materials back. This helps keep things organized and allows students to be in charge. My friends know that anything with a label can be touched by a 1st grader. If a bin doesn’t have a label, they need to ask me before touching! (The bins on the left are size small and the ones on the right are size medium.) On the bottom left, you see a thin, unlabeled bin. My friends know they must ask first to open this container (because it’s unlabeled). It holds all the dice I use for math games and differentiating math centers. I picked up a bead container from Michaels (with a coupon and my teacher discount) and it’s the perfect way to store dice!
Math Manipulatives and Math Centers
Then, we have our Math Center tubs and our Word Work tubs on the right. I use the Large Sterelite Clip Top Tubs for centers and absolutely love them. I know they are definitely an investment…BUT take it slow and collect them one unit at a time. (A unit included 6 containers). My first year of teaching I purchased 2 units (12 bins) and they are still in perfect condition. They are big enough to hold a sheet of paper without folding/bending it, as well as, the bins don’t open when dropped..a key detail in 1st grade! 😉
As my students make their reading and math choices, they grab the correct tub and during Word Work they also grab a word ring (as seen hanging from a Command Hook in the picture on the right). You can read more about our Math Centers here and more about Word Work here. If there are extra ‘pieces’ to a center that don’t fit in a container (i.e. a 100s board as seen on the left or magnetic letters as seen on the right) I keep them on the bottom of the containers. Students will look at the visual directions (math and word work) on the top of each bin and know they are missing something!

So, there you go friends! As you can see, I just made a few tweaks this summer to make things run a little more smoothly and keep our learning a little more intentional.
